The
following guide will show you how to correctly change your Network
Card’s MAC Address using the Windows Registry. Below are several
different methods to accomplishing this and I am sure that one will work
for you. These methods can be used in both Windows Vista and Windows 7;
I have not yet tested them in the Windows 8 environment.
1. Access your network connection properties and select the configure option.
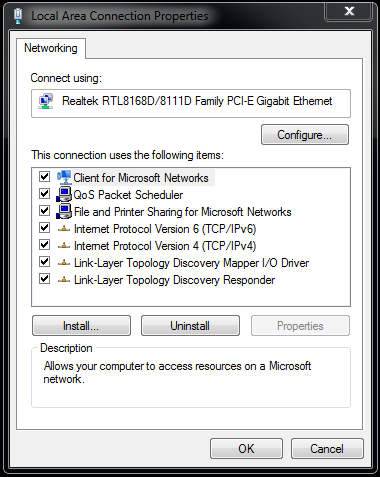
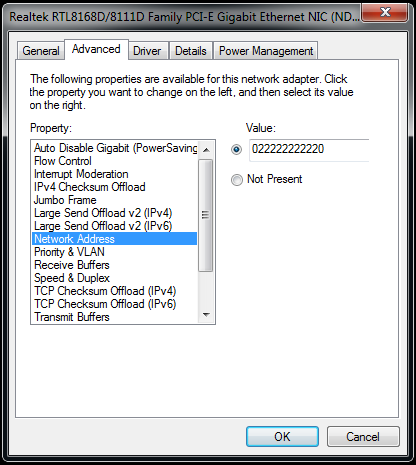
2. Select the Advanced Tab and then select Network Address. From here you need change the Value to custom and enter your desired MAC Address. Remember that this can only be twelve numbers in length.
3. Check to see if your MAC has changed using the “ipconfig /all” command in Command Prompt. If your MAC Address is still the same as your original please move to the next method.

1. Open your terminals Registry Editor by typing “regedit” into your start menus search box and pressing enter.

2. Once Registry Editor has opened navigate through the following path:
CODE :
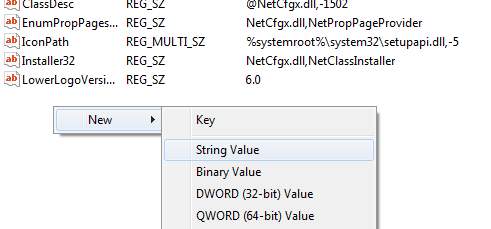
3. After you have navigated to this location you will need to create a new entry in the folder so that you can store the information for the new / fake MAC Address. To do this right click anywhere in the right-hand pane and select “New” > “String Value”
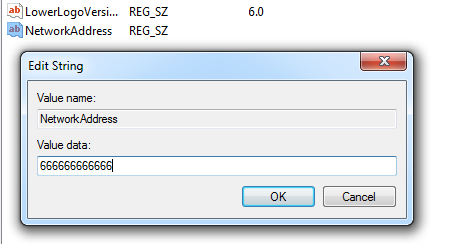
4. Rename this new entry to “NetworkAddress” and modify the details of this entry to the desired result. To edit the details simply right click the entry and select “modify”. Remember to ensure that the value is exactly 12 digits long, the length of a MAC Address.
5. Restart your network adapter and then view your MAC Address using an ipconfig /all command in command prompt. If your MAC Address is still the same as your original please move to the next method.

1. Step three is the last resort method but is also probably the quickest. Simply download and install Technitium MAC Address Changer from the below link:
CODE :
2. After installation you need to run the application and edit in your desired MAC Address in the “Change MAC Address” field and press the “Change Now” button. You will see an example of this in the screenshot below.
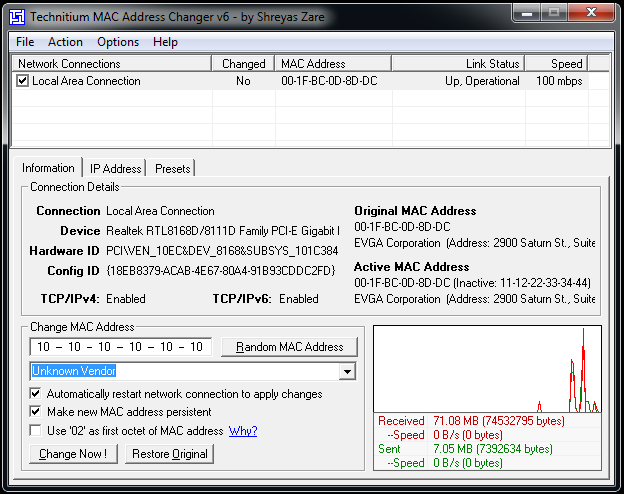
3. After you have done this a message box will appear informing you that your MAC Address has been successfully changed. To be sure of this simply use the checks outlined in Method 1 point three.

Method One:
1. Access your network connection properties and select the configure option.

2. Select the Advanced Tab and then select Network Address. From here you need change the Value to custom and enter your desired MAC Address. Remember that this can only be twelve numbers in length.

3. Check to see if your MAC has changed using the “ipconfig /all” command in Command Prompt. If your MAC Address is still the same as your original please move to the next method.

Method Two:
1. Open your terminals Registry Editor by typing “regedit” into your start menus search box and pressing enter.

2. Once Registry Editor has opened navigate through the following path:
CODE :
HKEY_LOCAL_MACHINE > SYSTEM > CurrentControlSet > Control > Class > {4D36E972-E325-11CE-BFC1-08002BE10318}
3. After you have navigated to this location you will need to create a new entry in the folder so that you can store the information for the new / fake MAC Address. To do this right click anywhere in the right-hand pane and select “New” > “String Value”

4. Rename this new entry to “NetworkAddress” and modify the details of this entry to the desired result. To edit the details simply right click the entry and select “modify”. Remember to ensure that the value is exactly 12 digits long, the length of a MAC Address.

5. Restart your network adapter and then view your MAC Address using an ipconfig /all command in command prompt. If your MAC Address is still the same as your original please move to the next method.

Method Three:
1. Step three is the last resort method but is also probably the quickest. Simply download and install Technitium MAC Address Changer from the below link:
CODE :
http://www.technitium.com/tmac/index.html#download
2. After installation you need to run the application and edit in your desired MAC Address in the “Change MAC Address” field and press the “Change Now” button. You will see an example of this in the screenshot below.

3. After you have done this a message box will appear informing you that your MAC Address has been successfully changed. To be sure of this simply use the checks outlined in Method 1 point three.

No comments:
Post a Comment